Introduction to Git Using the Command Line
Synching to Git & Git Configuration
Open your shell terminal or Git Bash and navigate to the folder you want to use for this workshop. Once you are in your chosen folder, type:
Input
git config --list
On MacOS, without any configuration your output might look like this:
Output
credential.helper=osxkeychain
On Windows, without any configuration your output might look like this:
Output
diff.astextplain.textconv=astextplain
filter.lfs.clean=git-lfs clean -- %f
filter.lfs.smudge=git-lfs smudge -- %f
filter.lfs.process=git-lfs filter-process
filter.lfs.required=true
http.sslbackend=openssl
http.sslcainfo=C:/Program Files/Git/mingw64/ssl/certs/ca-bundle.crt
core.autocrlf=true
core.fscache=true
core.symlinks=false
pull.rebase=false
credential.helper=manager-core
credential.https://dev.azure.com.usehttppath=true
init.defaultbranch=main
If your output is different, you may have your Git configured already. In this case, you can skip the next few steps, while we configure Git.
First, we need your username and email. Please note that you need to use the same email address in your Git configuration in the shell as you entered into GitHub when you created your GitHub account.
In the bash, type:
Input
git config --global user.name "Your GitHub username"
git config --global user.email "Your GitHub email"
In both cases, there should be no output, simply a new line. To check what we just did, you can re-type:
Input
git config --list
The output should now include your username and email.
Lastly, we need to set the name of our default branch to main.
Input
git config --global init.defaultBranch main
The init.defaultBranch value configures git to set the default branch to main instead of master.
We will quickly go over these steps: https://docs.github.com/en/authentication/keeping-your-account-and-data-secure/creating-a-personal-access-token#creating-a-personal-access-token-classic
Create Repository
A Git Repository is a data structure used to track changes to a set of project files over time. Repositories are stored within the same directory as these project files, in a hidden directory called .git.
First, let’s create a new directory using the command mkdir (make directory).
Input
mkdir gitWorkshop
To verify if the new directory was created, use the command ls (list directory).
Input
ls
In the output, you should see the directory you just created.
You then want to navigate to that new directory using the command cd (change directory).
Input
cd gitWorkshop
About Git
The biggest challenge to using Git and GitHub is understanding the terminology. Some terms make sense in English, while others don’t necessarily indicate what they are used for. The best way to learn Git and the Git terminology is to practice.
Generally, Git commands are written like this:
Input
git verb options
You always want to start with the keyword git. The verb is what you actually want to do (add, push, pull, init). The options are additional information that can be used with the verb.
Let’s continue creating a new Git Repository
Input
git init
The output should be:
Output
Initialized empty Git repository in <your file path>/gitWorkshop/.git/
Git: A few commands
Displaying the current project’s status
We can run the git status command to display the current state of a project. Let’s do that now.
Input
git status
The output says: No commits yet and nothing to commit.
Two steps: Adding and Committing
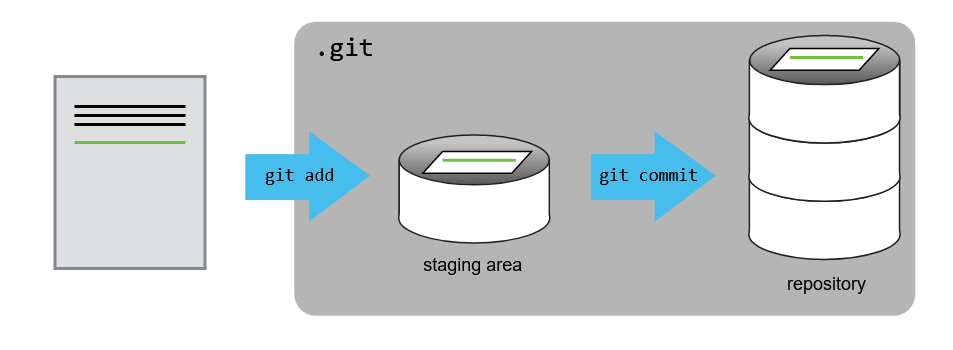
We will now create and save our first project file. This is a two-step process. First, we add any files for which we want to save the changes to a staging area, then we commit those changes to the repository. This two-stage process gives us fine-grained control over what should and should not be included in a particular commit.
Let’s create a new file using the touch command, which is a quick way to create an empty file.
Input
touch index.md
We can use the ls command to see the file we just created. Another way to see what we just did is to use Git Status again.
Input
git status
Now, Git status mentions there are untracked files and then includes index.md (in red).
This status is telling us that git has noticed a new file in our directory that we are not yet tracking. With colourised output, the filename will appear in red. To change this, and to tell Git we want to track any changes we make to index.md, we use git add.
Input
git add index.md
This adds our Markdown file to the staging area (the area where git checks for file changes). If you think of Git as taking snapshots of changes over the life of a project, git add specifies what will go in a snapshot (putting things in the staging area), and git commit then actually takes the snapshot, and makes a permanent record of it (as a commit). To confirm the file is in the staging area we want to use git status again.
Input
git status
The file is now written in green under the caption changed to be committed.
Now, before committing the file, let’s modify it. Please open the file index.md with any text editor we have at hand (e.g. Notepad on Windows or TextEdit on Mac OSX) and enter # Hello, world!. The hash character is one way of writing a header with Markdown. Now, let’s save the file within the text editor and check if Git has spotted the changes. There are ways to modify files directly in the command line, but I find it easier to simply open the file in a text editor.
Input
git status
The output says:
Output
On branch main
No commits yet
Changes to be committed:
  (use "git rm --cached <file>..." to unstage)
    	new file:   index.md
Changes not staged for commit:
  (use "git add <file>..." to update what will be committed)
  (use "git restore <file>..." to discard changes in working directory)
    	modified:   index.md
This output tells us that git spotted modifications to the file index.md that were not added to the staging area.
Input
git add index.md
Now, what we want to do is commit those changes to the repository. We are ready to commit our first changes. Commit is similar to ‘saving’ a file to Git. However, compared to saving, a commit provides a lot more information about the changes we have made, and this information will remain visible to us later.
When you commit changes, you want to use the -m option. That allows you to add a commit message. The commit message is used to record a short, descriptive, and specific summary of what we did to help us remember later on without having to look at the actual changes. If we just run git commit without the -m option, Git will launch nano (or whatever other editor we configured as core.editor) so that we can write a longer message.
Input
git commit -m "Add index.md with only a main header"
We can see that one file has changed and that we made one insertion, which was a line with the text ‘#Hello, world!’. We can also see the commit message.
Having made a commit, we now have a permanent record of what was changed, and git has also recorded some additional metadata: who made the commit (you!) and when the commit was made (timestamp). You are building a mini-history of your process of working with the files in this directory.
This time, git status will show us that there is nothing to commit.
Work with Branches
What are branches?
In git, a branch in a new version of the main repository. If you are working on a big project, it can be really useful to have a second branch to work on changes or new development. Working on a different copy of the work. Therefore, if you run into a problem, it is easy to go back to your older version. Branches allow you to work on different parts of a project without impacting the main branch. Once the work is complete, you can merge the branch to the main one.
You can use the command git branch to see what branches already exist in your repository. At this point, you should only have one named main.
Input
git branch
Create a new branch
To create a new branch, you can use the branch command.
Input
git branch develop
To see what was created, you can type git branch again.
Input
git branch
You should see two branches created, one develop and one main.
Navigate between branches
To navigate between branches, you want to use git checkout.
Input
git checkout develop
You should see a change in the path next to your identifier. It should say (develop) instead of (main). That is a sign that you moved to the new develop branch.
Now, let’s make a change to the index.md file.
Once you are done, type git status in bash. You should see that index.md was modified.
Just like we did before, we want to add the change to the staging area and commit those changes to the develop branch.
Once you are done, you can go back to the master branch.
If you now open the file, you won’t see the text you just added to the file. Don’t panic, it is normal, since you are currently working in the main branch. If you switch back to the develop branch, you will see the change you made.
Merging the develop branch to the main one
Now, we are ready to merge both branches. This will give us only one branch that incorporates the changes made in the develop branch.
From the master branch, you want to use the merge command:
Input
git checkout main
git merge develop
When you reopen index.md on your computer, you should now see the changes you made in the develop branch. You can now choose to keep that new branch or delete it.
To delete the develop branch, type this command:
Input
git branch -d develop
Finally, if you type in git branch, you should now only see the master branch.
Sharing your work with others
Connecting your local repository to the GitHub repository
We created a local repository on our own computer. Before the break, we have also created a remote repository on GitHub. But at this point, the two are completely isolated from each other. We want to link them together to synchronize them and share our project with the world.
To connect the repository on our own computer (local) to the repository we just created on GitHub, we will use the commands below:
Input
git remote add <origin link to your repository on GitHub>
For example:
Input
git remote add origin https://github.com/ClaraTurp/BiblioTECH_Git
Pushing changes
Now we have established a connection between the two repositories, but we still haven’t synchronized their content, so the remote repository is still empty. To fix that, we will have to “push” our local changes to the GitHub repository. We do this using the git push command:
Input
git push -u origin main
The nickname of our remote repository is “origin” and the default local branch name is “main”. The -u flag tells git to remember the parameters, so that next time we can simply run git push and Git will know what to do.
Pushing our local changes to the Github repository is sometimes referred to as “pushing changes upstream to Github”. The word upstream here comes from the git flag we used earlier in the command git push -u origin main. The flag -u refers to -set-upstream, so when we say pushing changes upstream, it refers to the remote repository.
You may be prompted to enter your GitHub username and password to complete the command.
When we do a git push, we will see Git ‘pushing’ changes upstream to GitHub. Because our file is very small, this won’t take long but if we had made a lot of changes or were adding a very large repository, we might have to wait a little longer. We can check where we’re at with git status.
Let’s now go see what happened in the GitHub repository we had previously created.